[ PREPARE ]
Before you start
- Use a Google account authorized to deploy in your organization’s Google Cloud project, with billing enabled. Your organization may also require approval to purchase Marketplace products.
- Ask your administrator to prepare a deployment service account with the project roles below and grant you permission to use it (including iam.serviceAccounts.actAs). It provisions infrastructure; it is separate from your inference API identity.
- Enable the Cloud Resource Manager API on the deployment project:
gcloud services enable cloudresourcemanager.googleapis.com --project=YOUR_PROJECT. New projects do not have it enabled, and the installer needs it to enable the other APIs it uses. - For a TPU model, have Compute Engine TPU quota in the cluster region before you deploy: GPT-OSS needs 8 chips of TPU v6e (quota
tpu_family:CT6E) and DeepSeek needs 4 chips of TPU v5p (quotaTPU v5p chips). Spot capacity draws on the Spot quotas instead (Preemptible TPU slices v6eandPreemptible TPU v5p chips); a reservation needs none. Request quota under IAM & Admin → Quotas. The installer checks on-demand and Spot quota before it creates the cluster and stops if it is missing. Quota does not reserve physical machines. - Use your computer’s terminal for the first API call, with Google Cloud CLI, kubectl, the GKE authentication plugin and curl installed. Your account needs cluster access and permission to retrieve or mint the API credential. Cloud Shell is an optional alternative.
Deployment service-account roles — prepare before opening Configure
The installer lists these ten roles on the deployment project. These permissions belong to the deployment service account; they are not a role checklist for every user or inference caller. Have your administrator review the infrastructure and IAM access they grant, and confirm the requirements in the current deployment form.
roles/cloudquotas.viewerroles/compute.networkAdminroles/compute.viewerroles/config.agentroles/container.adminroles/iam.serviceAccountAdminroles/iam.serviceAccountUserroles/resourcemanager.projectIamAdminroles/serviceusage.serviceUsageAdminroles/serviceusage.serviceUsageConsumer
Shared VPC or shared-reservation deployments can require additional access in the owning project. The person placing a Marketplace order also needs purchasing permissions for the selected billing account.
Google Cloud infrastructure charges apply in addition to Marketplace software fees. Review the current price in the listing.
Qwen CPU → New Cluster → Standard → dedicated VPC → isolated namespace → Generate bearer credential. Keep advanced defaults, then follow Send your first API request.
Open each step as you go. You can keep several steps open to compare them.
Step 1Sign in and open Google Cloud Marketplace
- Open Google Cloud Console. Sign in with the account you use for your Google Cloud project. Complete any password, passkey or organization verification Google requests.
- Check the account avatar at the top right. If you have several Google accounts, make sure the selected account has access to your deployment project.
- Click the project selector beside the Google Cloud logo. Search for your project by name or ID, then select it. If you need a new project or billing account, have your administrator prepare it before continuing.
- Open the Navigation menu (☰) at the top left and select Marketplace. You can also open Marketplace directly; recheck the selected project afterward.
If you are starting on a Compute Engine page, use the same navigation menu. Prio deploys to Google Kubernetes Engine (GKE); you do not create a standalone Compute Engine VM first.
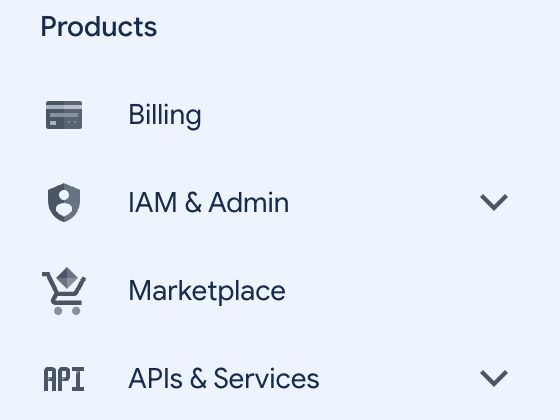
Step 2Search for Prio Model Serving Platform
- Click Find products or ask questions inside the Marketplace page.
- Type Prio Model Serving Platform and press Enter. You do not need AI Mode or the Container images filter: this offering is listed as a Kubernetes app.
- In the product results, select Prio Model Serving Platform from Renice AI, Inc. Check both the name and publisher.

You can also open the Prio Marketplace listing directly. If it does not load, follow the listing and account access checks.
Step 3Review the listing and click Configure
- Confirm the title Prio Model Serving Platform and publisher Renice AI, Inc.
- Read Overview, Pricing, Documentation and Support. Review the applicable product terms and your organization’s purchase requirements.
- If Google shows Purchase or Get, have an authorized purchaser complete the displayed billing, order and terms steps first. Return to the listing once the order is available for your billing account. If Configure is already shown, continue directly.
- Click Configure. The next page is titled Deploy Prio Model Serving Platform. Confirm that your selected project and release are still correct.
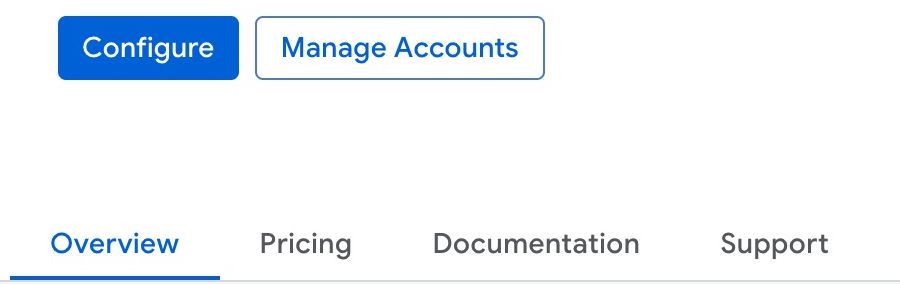
Google documents Purchase, Configure and Get as possible Kubernetes listing actions. The purchase step is conditional; it was not exercised with a new billing account in these captures.
Configuring the form does not create a cluster. Resource creation starts when you submit Deploy after completing the remaining steps.
Step 4Choose your project, account and model
Confirm your project in the top bar and select Click to Deploy on GKE. Follow this tab throughout the guide. Google may also display a command-line tab; you do not need it for this installation.
| Field | What to enter |
|---|---|
| Deployment name | Choose a recognizable name, such as prio-team-test. Check Solution deployments for an installation already using it. |
| Deployment Service Account | Select Existing account and your approved service account. Check its actual email in the picker; the display name can differ. New account requires permission to create it and grant the listed roles. Missing account or permission? |
| Model | Select the intended model explicitly, even if the form has a default. It determines the supported hardware and serving profile. |
| Model | Model hardware | Configured GKE modes | API model ID |
|---|---|---|---|
| Qwen3.5 0.8B | Int8 · n2-standard-16 CPU | Standard | qwen3p5-0p8b-int8 |
| GPT-OSS 120B | MXFP4 · TPU v6e · 8 chips · 2x4 | Standard or Autopilot | gpt-oss-120b |
| DeepSeek V4.1 Flash | Native MXFP4 · TPU v5p · 4 chips · 2x2x1 | Standard or Autopilot | deepseek-v4.1-flash-x4 |
Standard installations also need CPU capacity for system services. Reusing a cluster still provisions the model's compute, including a dedicated N2 model pool for Qwen.
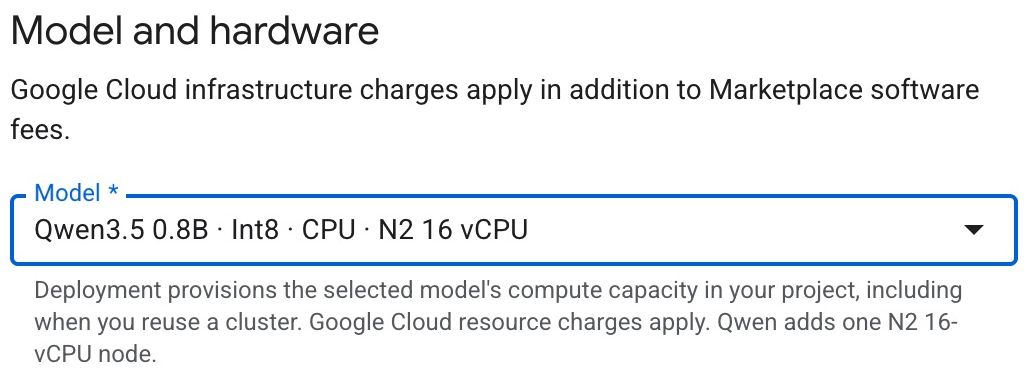
Step 5Select the cluster and capacity
Choose New Cluster or Existing Cluster first. After changing a mode or model, recheck dependent fields before submitting.
| Field | What to enter |
|---|---|
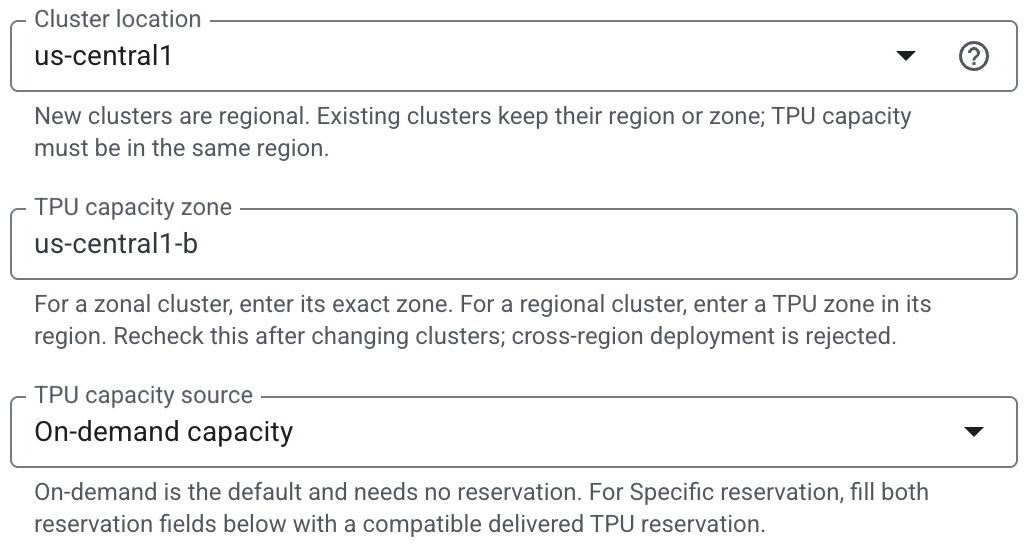
| New Cluster | Select the region in Cluster location. New clusters are regional. Enter a unique cluster name, such as prio-team-cluster: 2–40 lowercase letters, digits or hyphens, starting with a letter and ending with a letter or digit. The form does not check the length; a longer name fails while planning with cluster_name must be a valid GKE cluster name of at most 40 characters. |
| Existing Cluster / GKE cluster name | Select a cluster in your project. Its location and mode are retained. Appearing in the picker does not prove compatibility; installation validates it. Check requirements. |
| TPU capacity source | Choose On-demand capacity unless you have a compatible delivered reservation. Spot capacity costs less, but Google can reclaim it at any time; the model restarts once Spot capacity is available again. On-demand and Spot need no zone or reservation fields: GKE places the TPU in a zone of the cluster region that offers it. Neither guarantees stock. |
| Reservation owner project | For Specific reservation, enter its owner project ID. A shared reservation needs access granted by its owner. |
| Reservation name | Enter the exact name, not a URL. The reservation's zone, machine type, topology and available capacity must match. This option does not purchase a reservation. |
| Reservation zone | For Specific reservation, enter the reservation's zone, such as us-east5-b. It is required and must be in the cluster region; a region such as us-east5 is not a zone. The form shows this field only for a reservation. |
For Qwen CPU, there is no TPU zone or reservation to choose. A new Standard CPU cluster places its model pool within the selected region.
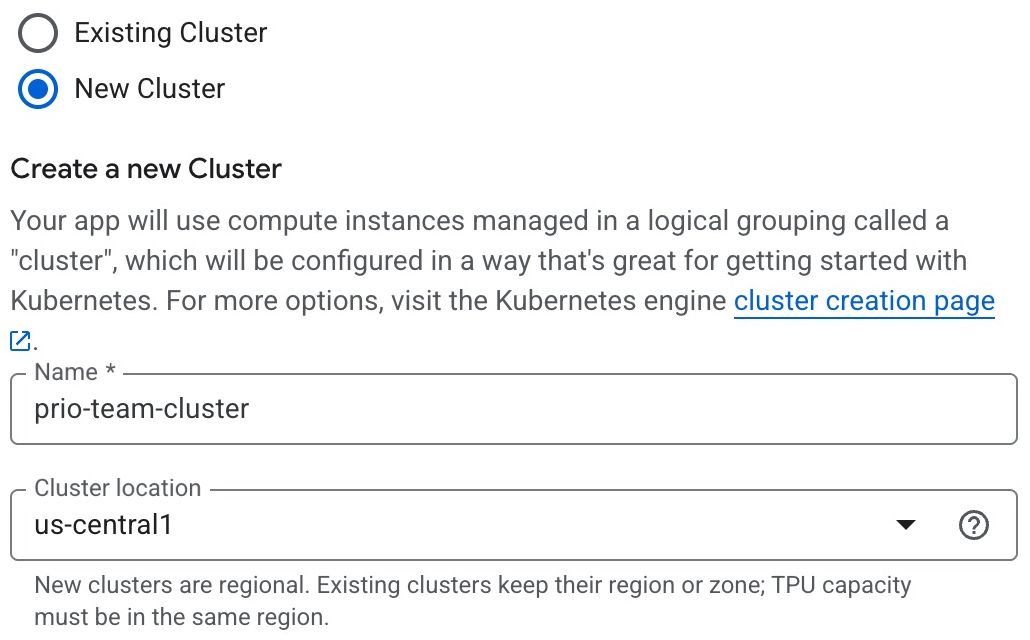
TPU capacity example
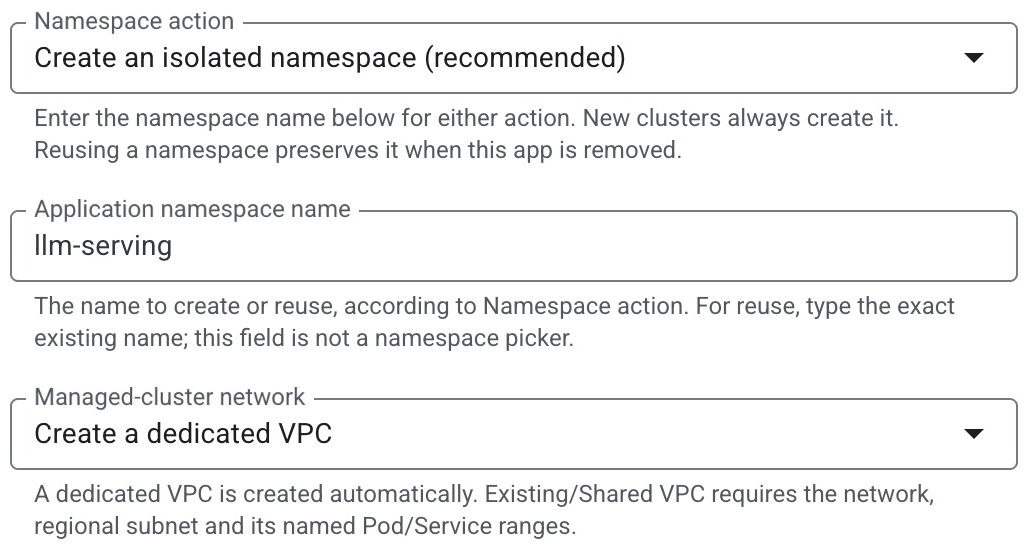
Step 6Set the namespace and network
| Field | What to enter |
|---|---|
| Namespace action | Applies to Existing Cluster only; a new cluster always creates its namespace and ignores this choice. Keep Create an isolated namespace for a fresh installation, or choose Reuse the namespace named below for one that already exists. |
| Application namespace name | Keep the default llm-serving or enter another name for either action. For reuse, type its exact existing name; this is not a picker. Keep a created namespace dedicated to this installation: uninstall removes it. |
| Managed-cluster network | For a new cluster, keep Create a dedicated VPC. Existing clusters retain their network. Existing/Shared VPC requires the administrator-prepared inputs below. |
Using an existing or Shared VPC for a new cluster
| Field | What to enter |
|---|---|
| Existing VPC | Enter its name or full self-link. A self-link identifies the host project. |
| Existing regional subnetwork | Enter the subnet name or self-link in that VPC and the cluster region. |
| Pod secondary range / Service secondary range | Enter two distinct secondary range names already configured on the subnet, not CIDR values. |
| VPC host project (for name-only inputs) | Under Advanced, enter the Shared VPC host project only when using names rather than self-links. Otherwise leave blank. |
The administrator must prepare Shared VPC attachment and IAM, routing, DNS and outbound HTTPS for image/checkpoint downloads. Customer-managed Cloud NAT needs at least 256 minimum ports per VM or dynamic port allocation. Dedicated VPC mode configures NAT itself.
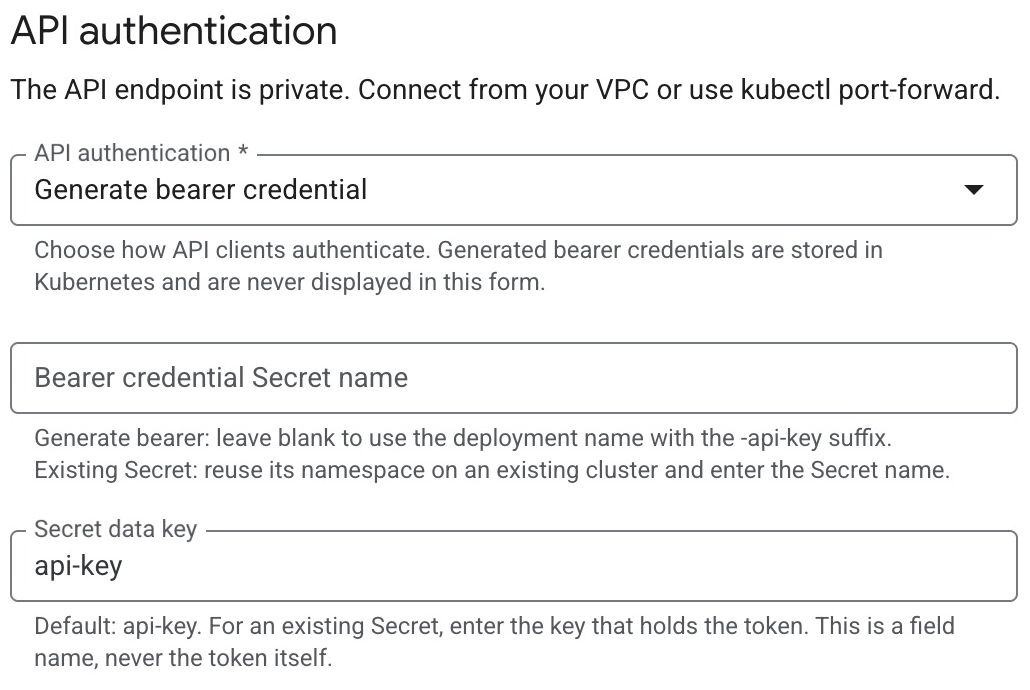
Step 7Choose API authentication
The GKE form uses a private API. Authentication controls who can call it; network access controls who can reach it. You need both.
Generate bearer credential — simplest first run
| Field | What to enter |
|---|---|
| API authentication | Select Generate bearer credential. |
| Bearer credential Secret name | Leave blank for the generated name (deployment name plus -api-key), or enter a name for a new Secret. |
| Secret data key | Keep api-key. This names the field storing the token; it is not the token itself. |
The token is generated inside Kubernetes, not displayed in the form. After deployment, step 10 reads it with kubectl and sends a request.
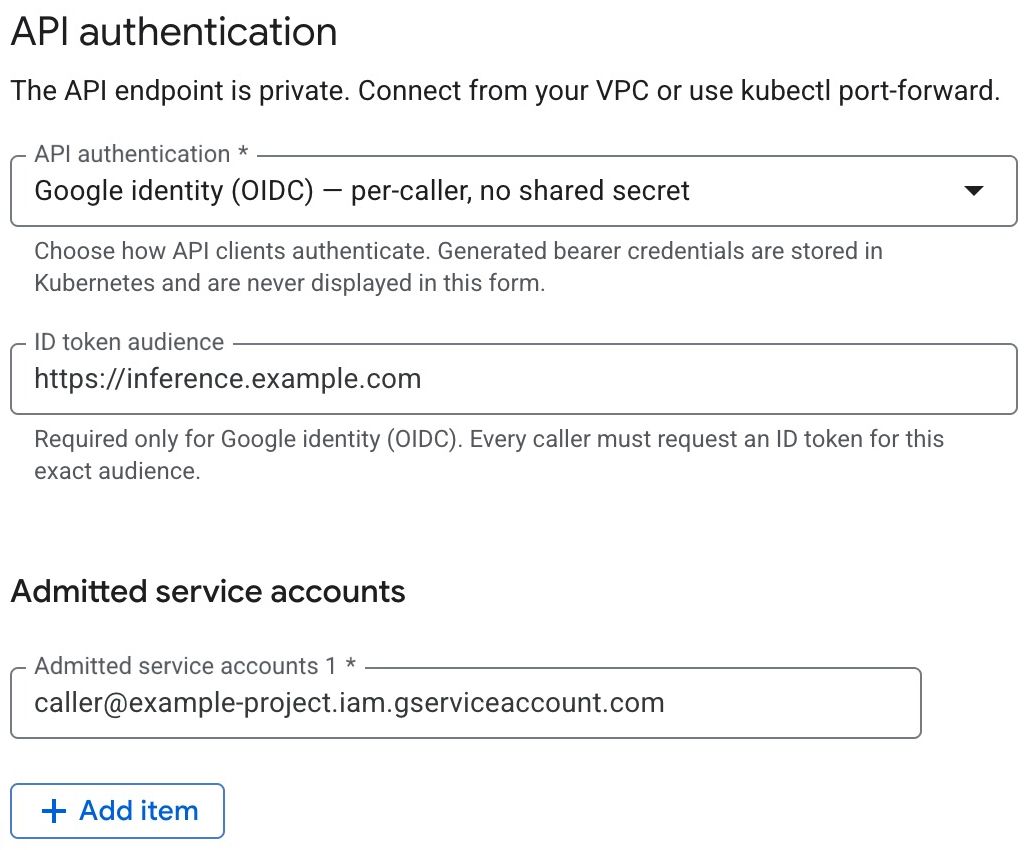
Google identity (OIDC) — one identity per caller
- Select Google identity (OIDC).
- Set ID token audience to the exact identifier your callers request, for example
https://prio.example.com. This does not create a hostname or public endpoint. - Add the exact caller service-account emails under Admitted service accounts. These need not be the deployment service account.
- For manual testing, an administrator must authorize you to mint an ID token by impersonating an admitted account. Step 10 shows the mint command; it includes the audience and email claim. A Google access token is not interchangeable.
Use existing Kubernetes Secret
- Choose an Existing Cluster and reuse the namespace containing the Secret.
- Select Use existing Kubernetes Secret. Enter its Bearer credential Secret name and Secret data key exactly.
- Have the administrator prepare that Secret before deployment. Never paste the token into either form field.
- The first-request command reads the Secret locally; your testing identity needs permission to read it.
No application credential — private network only
For an intentionally trusted private environment, select No application credential (internal only) and check the acknowledgement. Network reachability becomes the access boundary. Callers omit the Authorization header; the form still creates no public endpoint.
Step 8Review advanced settings
Keep the defaults unless your network requires changes. You do not need to add your computer’s IP address: kubectl reaches a new cluster through its DNS endpoint.
| Field | What to enter |
|---|---|
| Managed GKE mode | Shown for a new cluster. Keep Standard; Autopilot is supported for the TPU models, GPT-OSS and DeepSeek, and is rejected for the Qwen CPU model. Existing clusters retain their mode. |
| Inference API access - trusted VPC CIDRs | Empty allows the cluster subnet. An explicit list replaces that default: include every trusted client range you need. This permits inference traffic; it does not create an internet route to the private endpoint. |
| Allow connected VPC clients in other regions | Enable for callers in other regions that already have private network connectivity. This does not create VPN, peering or routes. |
| Dedicated subnet CIDR / Dedicated Pod CIDR / Dedicated Service CIDR | Keep the proposed non-overlapping ranges for a standalone VPC. Have the administrator allocate compatible ranges if you will connect it to other networks. |
| Private control-plane /28 | Keep the default or enter an administrator-approved, non-overlapping /28 range for a new cluster. |
| VPC host project (for name-only inputs) | Only needed for the Shared VPC case in step 6. |
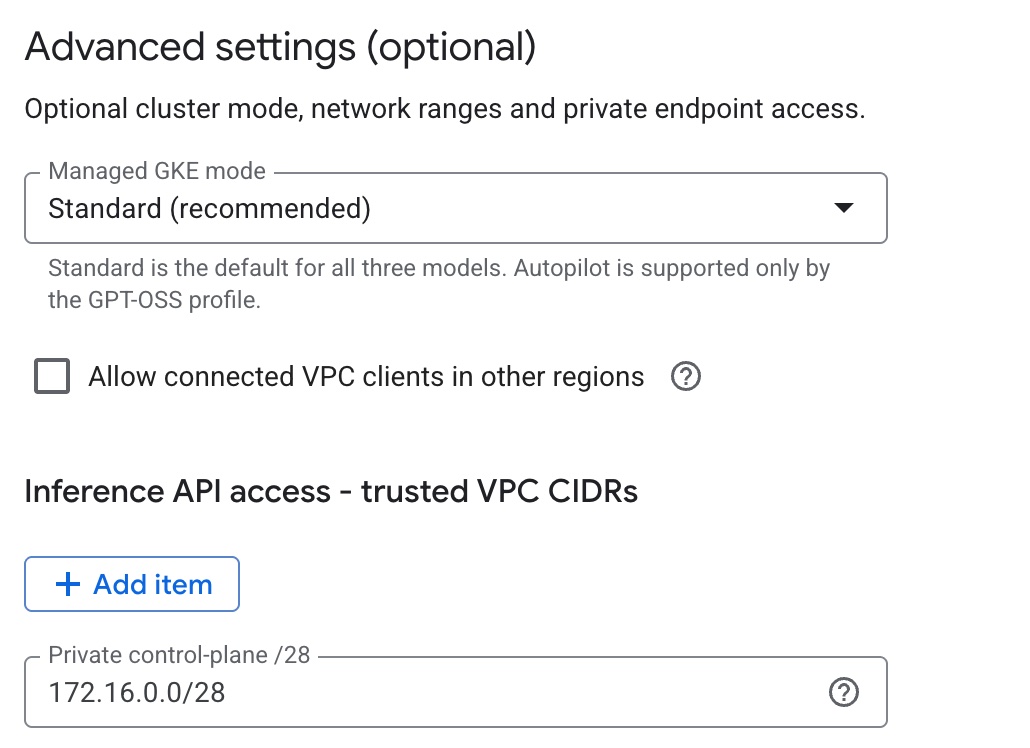
Inference API access only governs direct calls from your network. It does not affect kubectl and does not expose the model endpoint. Diagnose connectivity problems.
Step 9Deploy once and follow progress
- Recheck project, release, model, cluster, namespace, reservation and its zone if applicable, network and authentication.
- Review terms and pricing, then select Deploy once.
- Open Solutions → Solution deployments in the same project. Select your deployment and inspect its status and View Logs.
- A CPU deployment stays Deploying while the model loads and shows Deployed once its API is ready. A TPU deployment shows Deployed once its API is ready or after about 45 minutes, whichever comes first, so its model may still be loading. Either way, continue with step 10: its commands wait for the model.
Close the dialog and inspect the named deployment before retrying: the first request may still be running. Follow the duplicate-request recovery steps.
Checkpoint download, verification, restore and preparation can take time, especially for DeepSeek. Follow logs rather than assuming a fixed startup time or clicking Deploy again.
Step 10Send your first API request
The model API is private. From Cloud Shell or your own terminal, connect to the cluster, open a local tunnel and call the API. You only need the names you entered in the form.
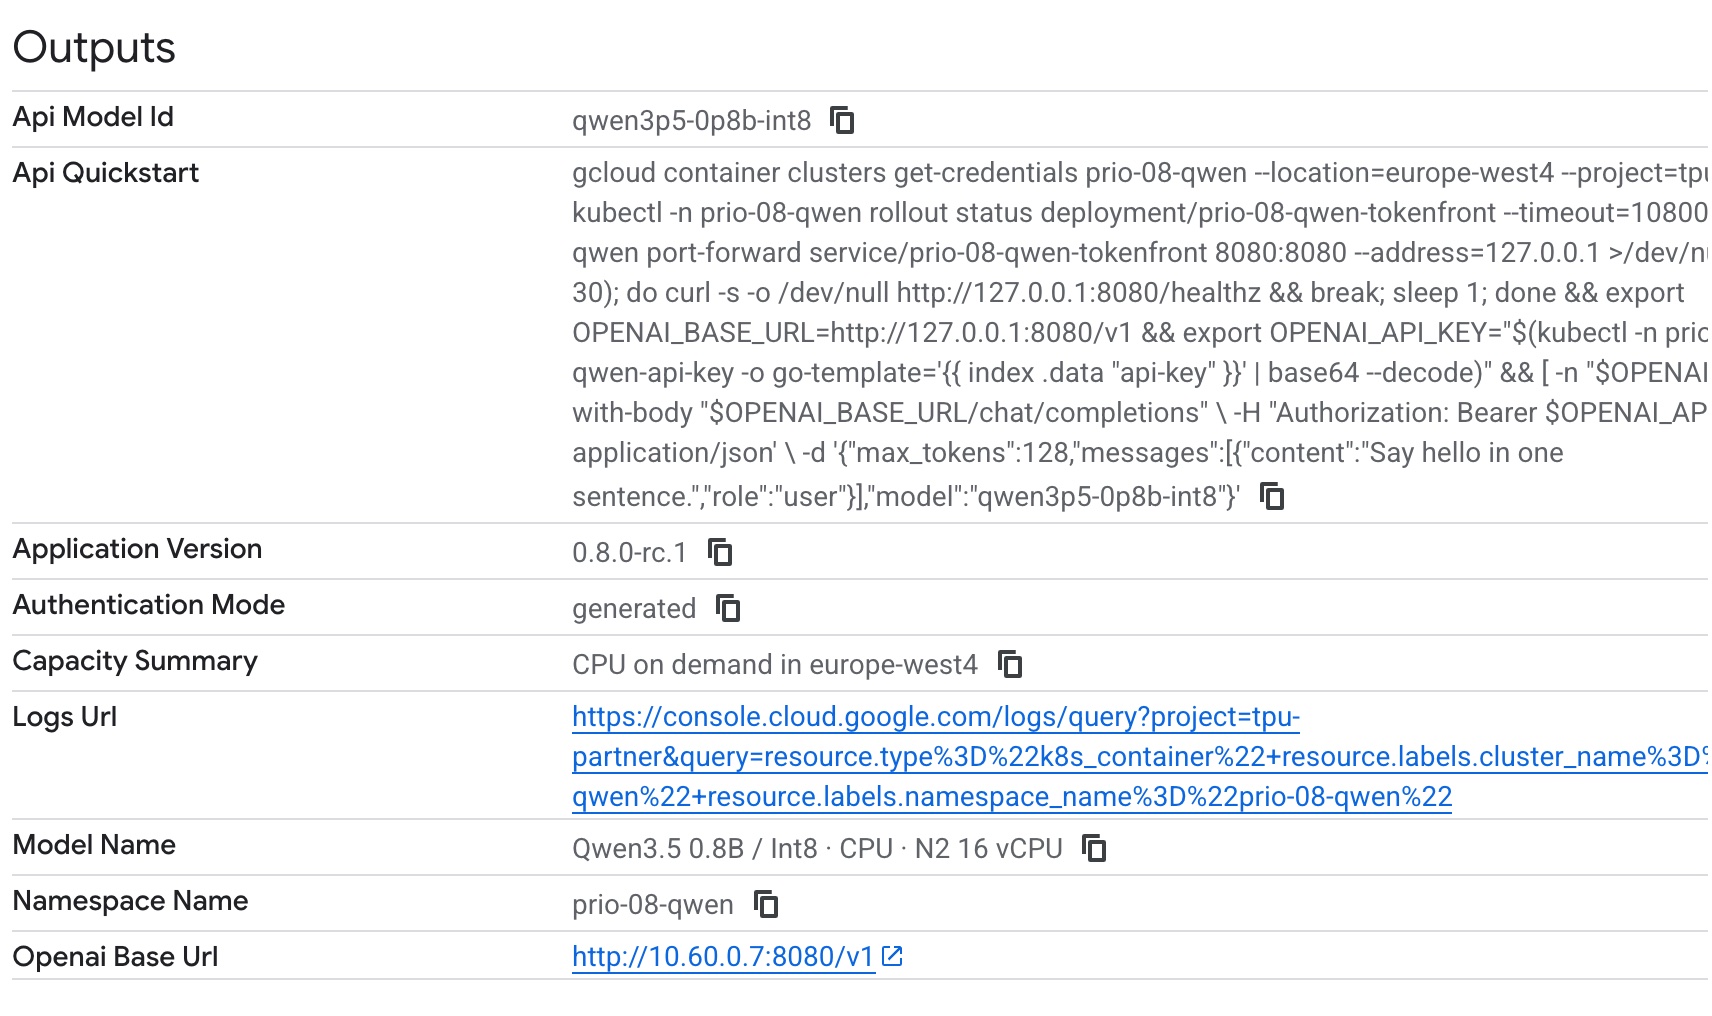
In Solution deployments, open your deployment, select Details and find Outputs. Copy Api Quickstart with its copy icon and paste it into Cloud Shell. It runs the three steps below with your values filled in.
Use your own computer instead of Cloud Shell
- Use Bash or zsh (on Windows, use WSL), with curl and Google Cloud CLI, kubectl and the GKE authentication plugin. Sign in with
gcloud auth login. - No IP allowlist is needed. A cluster the installer creates accepts kubectl through its DNS endpoint from any network; your Google identity authorizes the connection.
- Your account needs Kubernetes Engine Developer (
roles/container.developer) on the project, or an administrator’s narrower equivalent that can connect, port-forward and read the API Secret. For OIDC, it needs permission to impersonate an admitted service account instead of reading the Secret.
1. Connect to your cluster
Use the cluster name and location from the form, and your project ID. The location is the cluster's region, or its zone for a zonal existing cluster.
gcloud container clusters get-credentials YOUR_CLUSTER --location=YOUR_LOCATION --project=YOUR_PROJECT --dns-endpointFor an existing cluster, its administrator enables this once with gcloud container clusters update YOUR_CLUSTER --location=YOUR_LOCATION --enable-dns-access. If you already reach that cluster another way, omit --dns-endpoint.
2. Open the tunnel and load your API key
Set your deployment name and namespace (the form's default namespace is llm-serving). The commands wait until the model is ready, open a tunnel on a free local port in the background, and load the generated key into APP_API_KEY. If the tunnel does not start, they print its log and leave APP_BASE_URL unset, so no request is sent.
DEPLOYMENT_NAME=prio-team-test
NAMESPACE=llm-serving
kubectl -n $NAMESPACE rollout status deployment/$DEPLOYMENT_NAME-tokenfront --timeout=5h
unset APP_PORT APP_BASE_URL; APP_TUNNEL_LOG="$(mktemp)"
kubectl -n $NAMESPACE port-forward service/$DEPLOYMENT_NAME-tokenfront :8080 --address=127.0.0.1 > "$APP_TUNNEL_LOG" 2>&1 & PF=$!
for i in $(seq 60); do APP_PORT="$(awk '/^Forwarding from 127.0.0.1:/ { split($3, a, ":"); print a[2]; exit }' "$APP_TUNNEL_LOG")"; [ -n "$APP_PORT" ] && break; kill -0 $PF 2>/dev/null || break; sleep 1; done
if [ -n "$APP_PORT" ]; then export APP_BASE_URL="http://127.0.0.1:$APP_PORT/v1"; else cat "$APP_TUNNEL_LOG"; echo "The local tunnel did not start; see the log above."; fi
export APP_API_KEY="$(kubectl -n $NAMESPACE get secret $DEPLOYMENT_NAME-api-key -o go-template='{{ index .data "api-key" }}' | base64 --decode)"
Custom Secret names and other authentication modes
| Field | What to enter |
|---|---|
| Custom Secret name or data key, or an existing Secret | If you entered a Bearer credential Secret name or Secret data key in step 7, or use an existing Secret, replace $DEPLOYMENT_NAME-api-key and api-key with those values. Api Quickstart in Outputs already uses them. |
| Google identity (OIDC) | Mint a token instead: export APP_API_KEY="$(gcloud auth print-identity-token --audiences=YOUR_AUDIENCE --impersonate-service-account=YOUR_CALLER_SA --include-email)". It expires after an hour; run it again to renew. A Google access token is not interchangeable. |
| No application credential | Skip APP_API_KEY and remove the Authorization header from the requests below. |
3. Call the API
MODEL_ID=qwen3p5-0p8b-int8
curl -s $APP_BASE_URL/models -H "Authorization: Bearer $APP_API_KEY"; echo
curl --fail-with-body $APP_BASE_URL/chat/completions \
  -H "Authorization: Bearer $APP_API_KEY" \
  -H 'Content-Type: application/json' \
  -d '{"model":"'"$MODEL_ID"'","messages":[{"role":"user","content":"Say hello in one sentence."}],"max_tokens":128}'; echo
/models returns the API model ID and max_prompt_length, the prompt limit including chat-template tokens. Set MODEL_ID to that ID; the model table lists it too. Expect JSON containing choices. For streaming, add "stream":true to the JSON and -N to curl.
For an OpenAI-compatible client, use $APP_BASE_URL as its base URL and $APP_API_KEY as its API key, for example OPENAI_BASE_URL=$APP_BASE_URL OPENAI_API_KEY=$APP_API_KEY python your_app.py. When you finish, close the tunnel with kill $PF and run unset APP_API_KEY.
Call the API from your network without a tunnel
Applications in the cluster’s VPC call the private load balancer directly. kubectl -n $NAMESPACE get service $DEPLOYMENT_NAME-tokenfront shows its address under EXTERNAL-IP, and Outputs shows the same URL as Openai Base Url. Use http://ADDRESS:8080/v1 as the base URL; do not append a second /v1.
Admit the callers’ source ranges under Inference API access - trusted VPC CIDRs. The private endpoint uses HTTP inside your network; use an administrator-configured HTTPS endpoint when transport encryption is required.
The tunnel listens only on 127.0.0.1, and kubectl reaches the cluster over authenticated TLS. The model API still checks its configured credential. Never share tokens in tickets or screenshots. How Kubernetes port-forwarding works.
Step 11Clean up when you finish
Do not start cleanup by deleting the cluster, node pools, namespace or other managed resources individually. This bypasses the deployment's cleanup process and can leave its recorded state out of sync, block deletion of dependent resources, or leave resources running and incurring charges. Use the steps below so the deployment can remove what it owns in the required order.
- Stop clients, close the tunnel with
kill $PF(or close that terminal) and clear the key withunset APP_API_KEY. - In the correct project's Solution deployments, select your deployment, verify its name and choose Delete.
- Choose resource deletion if offered a choice. Retaining or abandoning resources does not stop their charges. Keep the deployment account and permissions available until deletion finishes.
- Wait for completion. Check GKE, Compute Engine disks and load balancers for this deployment's resources, including TPU nodes. A removed application or list entry alone does not prove compute is gone.
- If deletion fails, resolve the dependency or permission in its logs before retrying. Do not delete shared resources as a shortcut. Cleanup troubleshooting.
| Installation | What to expect |
|---|---|
| New dedicated cluster | Deletion removes deployment-managed application resources, namespace, cluster and dedicated VPC resources. Verify completion and any retained disks. |
| Existing cluster / network | The supplied cluster/network remain. Verify removal of the application, created namespace if any, dedicated CPU model pool or dynamically provisioned TPU capacity, and other deployment-owned resources. |
| Supplied namespace, Secret or reservation | These remain customer-owned. Uninstall does not cancel a paid reservation; it can continue incurring charges. |
Illustrative example
Solution deployments
| Status | Deployment name | Location |
|---|---|---|
| ✓ Deployed | prio-cpu-demo | us-central1 |
| ✓ Deployed | prio-tpu-demo | us-east5 |

[ NEXT / GET HELP ]
Something did not work?
The separate Troubleshooting & FAQ page covers duplicate requests, permissions, capacity, cluster compatibility, CIDRs, authentication, startup and cleanup.
Contact Renice support with the release version, model, location, deployment/operation ID and sanitized error. Exclude credentials and customer prompts or responses.